BladeMiner Setup Guide
- Step One
- Fund Your FBS Account
- Set Up Your VPS
- Set Up MetaTrader 4 (MT4)
- Set Up BladeMiner
- Set Up Currency Pairs
- Notes
- Settings
- Weekly Check
Step One
Note: All steps in this document should be carried out on a Desktop PC (not mobile/tablet). It is recommended to carry out the steps slowly and carefully - this is a once-off process and care has been taken to make it as easy to follow as possible (if anything is unclear, please do not hesitate to contact us).
If you have not already done so, please complete the 2 steps on the registration page.
Fund Your FBS Account
In order to trade, you will need to deposit funds into your account. Please see the deposit guide.
Set Up Your VPS
The BladeMiner Expert Advisor (bot) is simply an algorithmic script which runs inside Meta Trader 4 (MT4), an application used for trading forex. MT4 needs to run on a PC, 24hours, Monday to Friday (during forex market hours).
The PC that MT4 runs on, can either be your own one at home, or a Virtual Private server (recommended). If you choose to run it on your own PC (ie not using a VPS), you can skip this step and go straight to Install MetaTrader 4 (MT4).
A Virtual Private Server (VPS) is simply a PC that runs in the cloud (a remote server). While a VPS is optional, it is highly recommended to use because it frees up your own PC and is not prone to restarts, electricity cutouts, etc.
To get your VPS set up, please see the VPS Setup Guide.
Set Up MetaTrader 4 (MT4)
Install MT4
Note: If you are on a VPS (recommended), all the following steps are to be done on the VPS.
Files can be copied and pasted from your local PC to your VPS as with any other folder.
Once logged into your VPS (using MS Remote Desktop/whatever application you prefer), open a web browser (eg chrome) and visit this page (https://trader47.com/setup-guide/#set-up-mt4).
Next, download MT4 and save it to your VPS (desktop/downloads folder is fine the location doesn't matter).
Run the fbs4setup.exe file - this will install MT4 (aka FBS trader, see note below).
Please note that the MT4 installed is branded as FBS (and the application icon is simply 'FBS'. We will continue to refer to MT4 (even though the icon on your desktop says 'FBS', and is sometimes referred to as FBS Trader - see screenshot below). When referring to FBS, we are always referring to the FBS website, fbs.com.

Log In To MT4
Open MT4. Upon opening MT4 for the first time, you may be prompted with a login window as shown below.

Select 'Log in with existing acccount'.
Enter the details you made a note of (during registration) when you created your MT4 Cent Account on FBS. (if shown, tick the Save account information box so your details are remembered).
Make sure to use the server you made a note of (also received via email). If the server is not listed, use the server IP address (that you received via email/made note of).
If you were not prompted with a login window (or wish to change login to another account), you can log in to your trading account by clicking File > Login to Trade Account:

A login window will appear. Enter your details (tick the Save account information box).
Again, make sure to use the server you made a note of (also received via email). If the server is not listed, use the server IP address (that you received via email/made note of).

After logging in, you should see a screen similar to the following (notes in blue):

Close all the chart windows (we will be opening the correct ones with the right timeframe later).
When referring to a (currency) pair, we are referring to the chart window containing the price info for that pair.
Set Up BladeMiner
Download BladeMiner
Log in to your VPS (if not there already) and open Chrome.
Visit https://trader47.com/docs#download-blademiner (the same page you are on now).
Download the BladeMiner.ex4 file and store it on your VPS's Desktop or Downloads folder (doesn't matter where just make a note of where the file is).
Note: You can also download the BladeMiner.ex4 file to your local PC, and copy and paste it to the Experts folder on the VPS (in the next step). Whatever works for you.
Install BladeMiner in MT4
For BladeMiner to run inside MT4, we need to place it in the MT4 Experts folder.
In MT4, click File > Open Data Folder (a file explorer window will appear).
Navigate to the MQL4 > Experts folder:

Copy/move the BladeMiner.ex file (that you downloaded in the previous step), into the Experts folder. Once copied there, you can close the Experts folder.
In the bottom left hand side (LHS), in the Navigator window, expand 'Expert Advisors'.
Right-click on Expert Advisors, then click 'Refresh':

The BladeMiner EA ('BladeMiner') should now appear under Expert Advisors:

If you do not see the BladeMiner EA here, go back and carefully check you have followed the steps correctly.
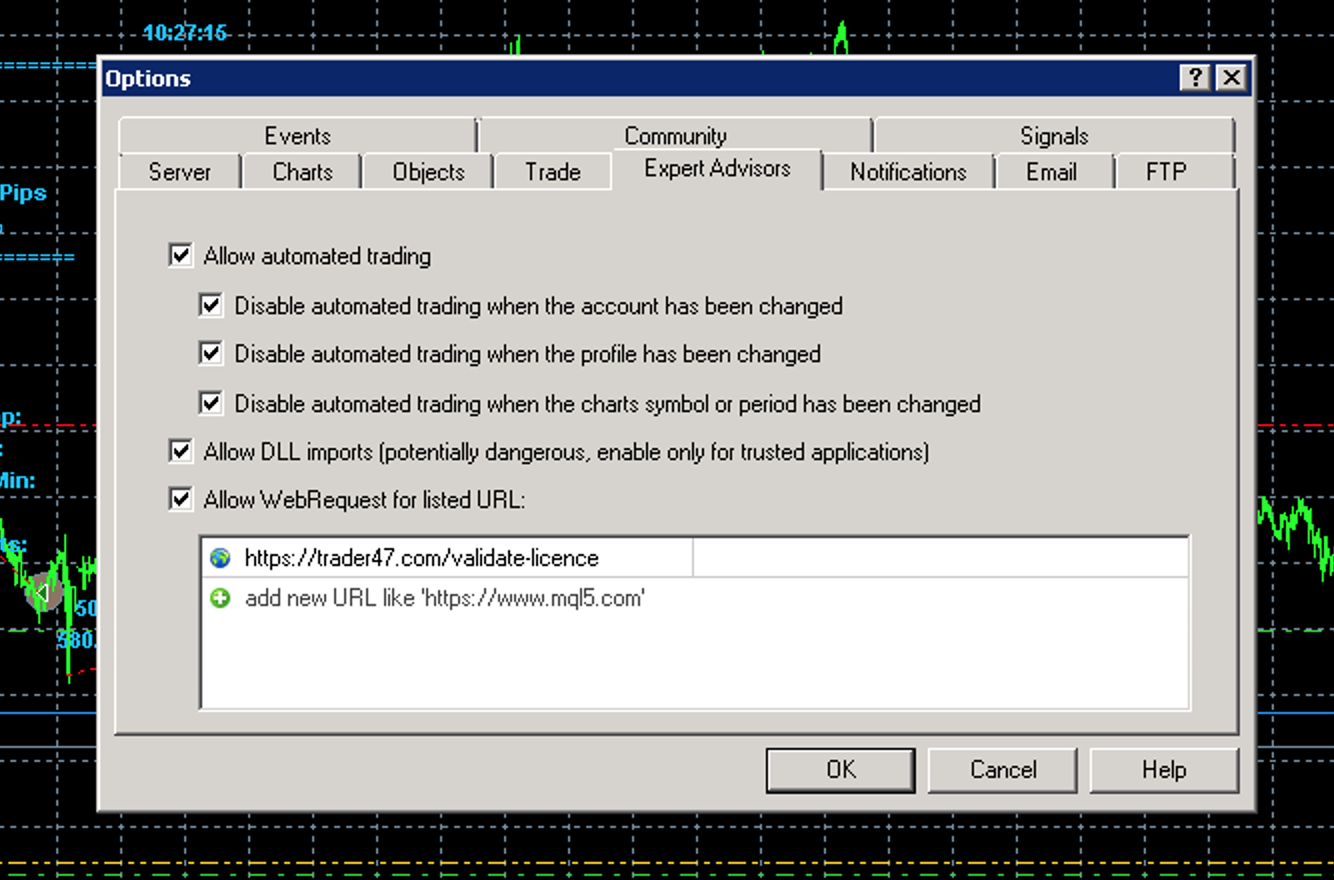
Add Licence Validation URL
To enable BladeMiner licence verification (required for BladeMiner to run), the validation URL needs to be added to MT4's safe-list (for security reasons):
Go to MT4 > Tools > Options > (tab) Expert Advisors.
Under 'Allow WebRequest for listed URL', click the '+' and add the following URL:
https://trader47.com/validate-licence
Note: For the change to take effect (ie the URL to get saved), after pasting in the URL, click away from the input field.
Enable AutoTrading in MT4
To allow BladeMiner to automatically place orders (trade), enable 'AutoTrading' (ensure this is always enabled):

BladeMiner is now successfully set up. Next: Setting Up The Currency Pairs
Set Up Currency Pairs
Set Up EURUSD
In the Market Watch window, find the EURUSD symbol. Tip: To easily find a symbol, type the first letter of the symbol (in this case 'E') until the symbol is highlighted.
Right-click EURUSD then select 'Chart Window':

Maximize the EURUSD chart and set the timeframe to M5 (5 minutes):

Tip: Click image to zoom in.
For EURUSD and all the other currency pairs, always keep the charts on 5 minute timeframe.
Add BladeMiner to the chart by going to the 'Navigator' Window (underneath Market Watch), Expert Advisors > Right Click on 'BladeMiner' and select 'Attach to a chart':

The BladeMiner settings Window will appear. Select the 'Common' tab first and enter the values as per the below screenshot:

Select the 'Inputs' tab and enter the following values:
Licence: Your BladeMiner licence, available on your account.
Please note: Only continue with these steps once your licence is active.
Lot: Starting Lot value, based on your account balance. See the lot calculator for how to calculate it.
ShutDown & EmergencyCloseAll: Leave as is (false, rarely required).
See BladeMiner settings for more info.

Click OK. BladeMiner should now load and if all is well you should see something like the following:
If you do not see a smiling face in the top right hand side, go back and check you have followed all steps exactly.

Note: Always keep the chart open! Closing a chart will stop the bot from trading (but trading positions will remain active and un-managed, causing potential losses).
Congratulations! You have now successfully set up EURUSD, the first currency pair. Next: Setting up the rest of the pairs (don't worry this goes quicker, now you know how :).
Set Up The Rest Of Currency Pairs
To set up the rest of the currency pairs, repeat the steps for EURUSD for all the pairs below, starting with EURGBP.
If you cannot see a certain pair in the list on the left, double-click at the bottom of the list:

As you open each new chart, maximize it (charts will overlay each other), so that the pair windows can be selected from their tabs at the bottom of the chart:

- EURUSD (skip this one, it’s done already)
- EURGBP
- EURCHF
- EURCAD
- EURAUD
- AUDUSD
- AUDNZD
- AUDCAD
- GBPUSD
- GBPCAD
- USDCAD
- USDCHF
Once all pairs have been set up, your MT4 should look similar to the following (different figures of course):

Checklist, ensure the following (golden rules!):
All pairs are on 5min chart.
All pairs have a smiley face in top RHS of chart.
Always ensure all charts remain open.
Always ensure your PC (VPS) remains on during market hours (ensure Windows automatic updates are disabled, see the VPS Setup Guide for how to do this if on VPS. If you're not using a VPS simply google how to disable auto updates for your operating system).
Never interfere with the bot. No matter how tempting it is, do not override the bot's trading (do so at own risk).
Once a week, log in to your VPS and check it is running (sometimes it crashes, in which case simply go to your Cloudzy admin panel and restart it).
Roughly once a week (or after recent account growth), update your lot size on your currency pairs.
Give yourself a pat on the back, it's all done and your BladeMiner bot is now trading!
Notes
Remove Swap Fees
Please see How do I remove swap fees?.
Daily Statement Email
Every evening (around 3am) FBS will send you a daily statement. The trading result is the results of closed out trades. The unrealized PnL is the profit/loss of current open orders (trades). This is basically a snapshot of the "Trade" tab at the bottom of your MT4:
If you did not receive your daily statement email (or the figures look odd) don't worry this happens sometimes. Simply log in to FBS and ask Live Chat support to send your daily statement email. You can also update your FBS email statement settings.

In this case, -$3106.08 (= $31.06 in real dollar value) would be the figure that corresponds to 'Unrecorded P/L' in the daily statement email
Please note: You may be wondering why your current PnL (profit) is usually negative? This is normal and how the bot works. Forex markets range 80% of the time (price reverts back to previous levels) and this is what the bot takes advantage of, price reversion.
Track Performance With FxBlue
A great way to track your account's performance (see chart on the homepage - great for stats) is by registering for FxBlue's free account performance tracking service.
FxBlue connects to your account using your investor password (so they get read-only access and can't place any trades). To start tracking your account performance with FxBlue, simply register (100% free) below:
BladeMiner Settings
To update the BladeMiner settings, simply click on the smiley face in the top right hand side of a chart. After initial setup, the only setting you should be updating (weekly) is the Lot value.
Licence: Your BladeMiner licence (unique to your account), available in your account settings.
Lot: Starting Lot size. See the Lot Calculator.
ShutDown: Setting this value to true will cause the bot to not open any new trades after all current trades have closed. This is the safest way to stop trading.
EmergencyCloseAll: Causes all trades to immediately close for the current pair (only to be used in extreme circumstances!).
Weekly Check
It is important to check your bot is running at least once a week.
Recommended:
Set a (repeat) Google task
as a weekly reminder (eg every Tuesday morning/evening).
(when you mark a repeat task as 'complete', it will re-appear on the designated repeat date + time).
Check That Your VPS & BladeMiner Are Running
Sometimes the VPS will die due to various reasons: Cloudzy performs updates, etc. The VPS is simply a computer (running old software, Windows Server 2012 and MT4 are both quite old) running on a remote server. As we all know, computers tend to get slow the longer they run and sometimes simply crash. The VPS is no different. It will sometimes need restarting.
When checking your BladeMiner bot is running, pay careful attention to the following:
- If you cannot connect to your VPS, simply log in to your cloudzy control panel, click on the relevant VPS (service) and restart it. If that fails to work, you can log a support ticket (Cloudzy support is quick to respond and very helpful).
- Ensure MT4 is running and connected. Sometimes it will not be connected due to the "old version" issue. Fixing the MT4 old version error is easy and only takes a couple of minutes.
Update Starting Lot Sizes
It is recommended to check your lot sizes at least every 2 weeks. See When To Update Lot Sizes.